How to Grow Hydrangeas from Cuttings: A Gardener’s Guide to Success
Growing hydrangeas from cuttings is a rewarding and fulfilling experience for any gardener. With the right materials and techniques, you can propagate your hydrangeas and watch them flourish. Let’s dive into the process and make your gardening journey seamless and enjoyable.
Engaging Introduction
Hydrangeas are a gardener’s delight, known for their stunning blooms and lush foliage. Propagating hydrangeas from cuttings not only allows you to expand your garden but also connects you to the calming rhythm of nature. This guide will walk you through each step, ensuring your cuttings thrive and bring vibrant beauty to your garden.
Materials Needed: Ingredients Overview
Before we begin, let’s gather the necessary materials to ensure a smooth propagation process:
- A Healthy Hydrangea Plant: Choose a robust and disease-free plant as your source.
- Pruning Shears or a Sharp Knife: Clean and sharp tools are essential for making precise cuts.
- Potting Soil (Well-Draining): Provides the right environment for root development.
- Perlite or Vermiculite: Enhances soil aeration and drainage.
- Rooting Hormone (Optional): Encourages faster and stronger root growth.
- A Container or Pot: Use a small pot initially for the cutting.
- Plastic Bags or a Plastic Cover: Creates a mini greenhouse effect to maintain humidity.
Step-by-Step Instructions
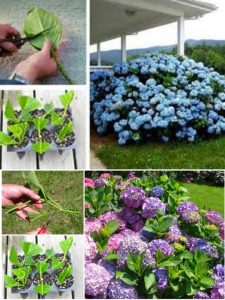
1. Choose Your Cutting
Select a strong, healthy branch from your hydrangea plant. Look for a piece with new growth, approximately 5-6 inches long, and free from flowers. New growth is more likely to root successfully.
2. Prepare the Cutting
Using pruning shears or a sharp knife, cut the stem at a 45-degree angle just below a leaf node. This angle increases the surface area for rooting. Remove most of the leaves from the cutting, leaving only a couple at the top. If you wish, dip the cut end into rooting hormone to promote faster rooting.
3. Plant the Cutting
Prepare a potting mix by combining equal parts of well-draining potting soil and perlite or vermiculite. This mixture ensures good drainage and aeration. Plant the cutting in the soil mix, ensuring the leaves do not touch the soil to prevent rot.
4. Create a Mini Greenhouse
Cover the pot with a plastic bag or a plastic cover to create a humid environment, essential for rooting. Make sure the plastic doesn’t touch the leaves. This mini greenhouse helps maintain moisture levels around the cutting.
5. Care for Your Cutting
Place the pot in a location with indirect light. Direct sunlight can be too harsh and may dry out the cutting. Keep the soil consistently damp but not waterlogged. Overwatering can lead to root rot, so be cautious.
6. Check for Root Growth
After a few weeks, check for root development by gently tugging on the cutting. If you feel resistance, it indicates that roots are forming. Patience is key during this stage, as root development can take time.
7. Transplant Your Hydrangea
Once a strong root system has established, it’s time to transplant your new hydrangea. Choose a larger pot or a garden spot with well-drained, rich soil. Plant the hydrangea and continue to care for it, ensuring it receives adequate water and indirect light.
Valuable Tips for a Seamless Gardening Experience
- Tool Maintenance: Always use clean and sharp tools to prevent disease transmission and ensure clean cuts.
- Humidity Management: If the plastic bag touches the leaves, use stakes to keep it elevated.
- Gradual Acclimation: When transplanting outdoors, gradually acclimate the plant to direct sunlight to avoid shock.
- Seasonal Timing: Late spring to early summer is the best time for taking cuttings when the plant is actively growing.
Frequently Asked Questions (FAQs)
Q: Can I propagate hydrangeas from any type of cutting? A: It’s best to use softwood cuttings taken in late spring or early summer when the plant is actively growing. Hardwood cuttings taken in fall or winter can also work but may take longer to root.
Q: Do I need to use rooting hormone for successful propagation? A: Rooting hormone is not necessary but can significantly increase the chances of successful rooting, especially for beginners.
Q: How long does it take for hydrangea cuttings to root? A: Typically, it takes about 2-4 weeks for roots to develop, but this can vary depending on environmental conditions and the health of the cutting.
Q: What should I do if my cutting starts to wilt? A: Ensure the cutting is not receiving too much direct sunlight and that the soil remains consistently damp. Wilting can also indicate that the humidity is too low, so make sure your mini greenhouse is effectively maintaining moisture.
Q: Can I propagate hydrangeas in water? A: While some gardeners have success with water propagation, it is generally less reliable than using a soil mix. Soil provides better support and nutrients for root development.
By following these detailed instructions and tips, you can enjoy the process of growing hydrangeas from cuttings and expand your garden with these beautiful blooms. Happy gardening!
This version adds detailed descriptions, valuable tips, and a FAQs section to create a comprehensive and engaging guide for gardeners


